
Add members, assign cards, delete members etc
The 'Card-Only' tab is the third tab on the members table. When a person's details are added to the Card-Only tab they become a guest of SaferMe.
The Card-Only tab is a contact tracing feature and is used by contact tracing customers. This tab exists for contact tracing admins to assign, remove and manage wearables contact cards. Admins can conduct a contact trace within the Card-Only tab also.
Jump straight to
- Add members to SaferMe
- Add members by CSV file upload
- Downloading member data
- Assigning cards to members
- Deleting members
How to get there
To access the Card-Only tab a user needs to be a Manager of an organization and signed into SaferMe on desktop. Click the 'Admin' button on the top right of the toolbar in SaferMe and select the 'Card-Only' tab.
Access for Card-Only members
- Employee details are added to the Card-Only tab and assigned contact cards
- Card-Only members don't receive an email invite from SaferMe
- Card-Only members don't use the SaferMe app directly in any way
- Card-Only members don't need to sign up or log in to SaferMe ever
- Card-Only members aren't added to channels or upgraded to a different roles
Adding Members to the Card-Only tab
How to Add a Card-Only Member
- Select Add a Member at the top of the Card-Only page
- Type the employee/visitor/contractor details in the form
- The only required field is Full name
- Company, Visiting and Preferred contact are optional fields
- If entering a person for the Visiting field, click on the field to search for the name of the person from the Current tab
- Click Add Member
Adding Card-Only Member by CSV File Upload
How to Add a Card-Only Member via CSV
A valid csv file must contain a column named “First name” and may contain “Last name”, “Company” and “Preferred contact” columns.
All columns accept any text, symbols and spaces.
- Select Add Member at the top of the Card-Only page
- Click Import from CSV
- Navigate to the file you want to upload and select it
- Click Add Member
- After the file has been uploaded successfully, you will see a confirmation message.
- Click on Add Members
If the file contains errors, you will see a message asking you to review your file and try again.

By default, employees who don’t have a card assigned to them will appear at the top of the Card-Only table. They are sorted by the time they were added to the organization, from most recent to oldest.
Download Card-Only Member(s) Data
The download button is located to the left of the “Add a Member” button. Clicking the download button will prompt a request to download the data of employees in the Card-Only tab.

Assigning Cards to Card-Only Members
Assigning a Card to Card-Only Members(s)
- Select the employee name(s) who are to be assigned cards on the Card-Only tab
- Click 'Assign Card' from the menu bar
- Alternatively click the three dot menu on the far right of the member's name
- Click 'Assign Card' from this menu
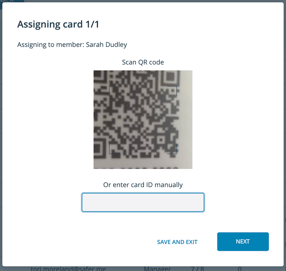
- Allow access to camera on the pop up (permission only has to be granted once)
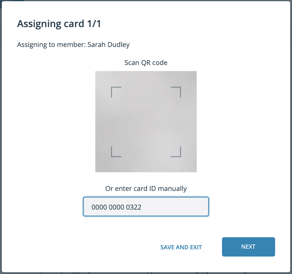
- Scan the QR code of the card or enter in the card ID number manually
- Click 'Next'
 .
. 
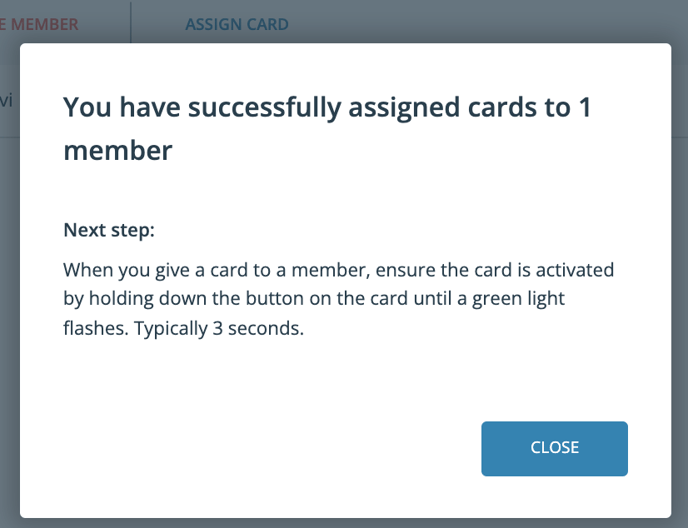
- If assigning more than one card, go through the flow for as many employees selected
- A success message will appear to confirm the assignment(s)
- The message will also include a reminder to activate the card(s)
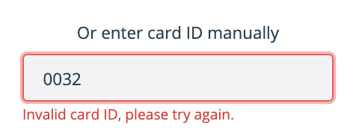
- If an incorrect card ID is entered an error message will appear
- Make sure to enter in all 12 digits displayed on the card to avoid an error message
- Card-Only members cannot have more than one card issued to them at the same time.
- Card-Only members cannot self-assign. Only Managers, Admins and Owners can assign cards to guests.
- Managers, Admins and Owners can assign cards to themselves.
Removing Cards from Card-Only Members
Removing a Card from a Card-Only Member
- Use the search bar to look up the employee
- Click the employee's name to open their contact log table
- Above the contact data are the contact card details
- If there are no contact card details visible the member does not have a card assigned to them
- It is vital to sync the card BEFORE removing the card from an member
- Once the card has been synced click 'Remove Card' from the card details menu
- Alternatively click the three dot menu beside the member's name on the members table
- Click 'Remove Card'
- Ensure the details are correct
- Select a reason for removing the card from the drop down
- A success message will appear once the card has been removed
Deleting Card-Only Members
Employees with a card assigned to them or with contact data cannot be deleted.
An error message will appear if an attempt is made to delete an employee that has a contact card or has contact card data.
Contact data of Card-Only members older than 42 days is automatically deleted from the system. Once data of an employee has been deleted, and the contact card has been removed from the user manually, the employee name can be deleted from the organization.
Deleting a Card-Only Member
- Navigate to the Card-Only table
- Select the employee you want to delete
- Alternatively, click the three-dot menu on the far right of the member you want to delete
- Click “Delete Member” from this menu
- Click “Delete” on the pop-up dialogue
Deleting Card-Only Members in Bulk
- Navigate to the Card-Only table
- Select the members you want to delete
- Click “Delete Members” from the menu bar
- Click “Delete” on the pop-up dialogue
Get in touch with our team to chat about Card-Only members, email us at support@saferme.me